
Hidden Features in Your Screenshot Tools You’re Probably Not Using
Taking screenshots has become second nature for most users — a quick press of a few keys, and you’ve captured whatever is on your screen. But screenshot tools on Windows, macOS, Android, and iOS offer far more than simple screen grabs. Beneath the surface are powerful features that can save time, boost productivity, and even enhance creativity — yet most people don’t realize they exist.
Whether you’re working on a laptop, tablet, or smartphone, this article explores the hidden features in your screenshot tools that you’re probably not using — but should be. From scrolling captures to instant markup and OCR text extraction, these built-in functions can transform the way you work and share information.
1. Scrolling Screenshots (Capture Beyond the Screen)
Ever needed to capture a full web page, chat conversation, or document that doesn’t fit on one screen? Most users take multiple screenshots and stitch them together — but modern tools offer scrolling screenshots, also called long screenshots or full-page captures.
How to use:
- Windows (Edge browser): Use “Web Capture” > “Full Page” to scroll and save an entire webpage.
- macOS (Safari): Use “Export as PDF” to capture full pages (alternative to screenshots).
- Android (Recent versions): After taking a screenshot, tap “Capture more” to scroll automatically.
- iOS (Safari): When taking a screenshot in Safari, tap “Full Page” in the preview window.
This feature is a game changer for documentation, research, and content saving.
2. Text Extraction from Screenshots (OCR)
Did you know you can copy text directly from an image or screenshot? Optical Character Recognition (OCR) technology built into many systems can read and convert image-based text into editable content.
How to use:
- Windows (PowerToys + Text Extractor): After taking a screenshot, PowerToys can extract text from the image.
- macOS (Preview or Live Text on M1/M2+): Select text in a screenshot opened in Preview, or hover over text in the image and copy.
- iOS (Photos app): Screenshots with text allow you to tap and hold to select words or phrases.
- Android (Google Photos + Lens): Open a screenshot and tap the Lens icon to extract and copy text.
Perfect for digitizing documents, copying quotes, or saving snippets from PDFs and scanned pages.
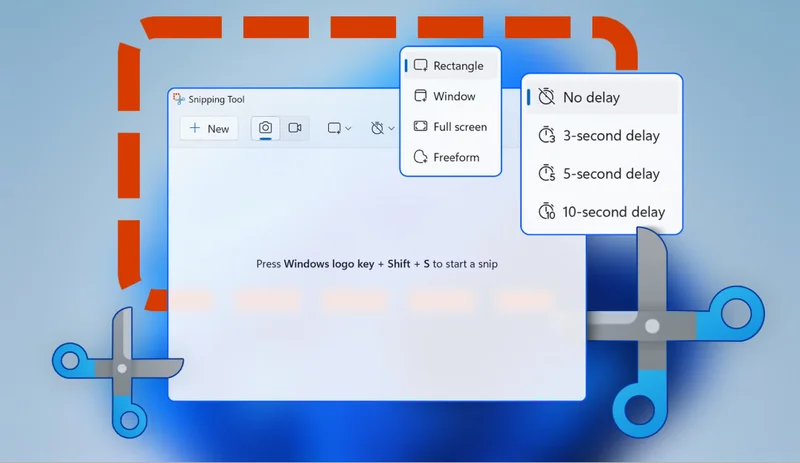
3. Delayed or Timed Screenshots
Capturing dropdown menus or hover tooltips can be tricky with instant screenshots. Thankfully, most screenshot tools offer a delay timer — letting you set up the screen exactly as needed.
How to use:
- Windows Snipping Tool: Click the “Delay” dropdown to select 3, 5, or 10 seconds.
- macOS: Use Command + Shift + 5 > “Options” > Set timer (5 or 10 seconds).
- Android/iOS: Use third-party apps like Screen Master (Android) or Screenshot Pro (iOS) for delay features.
This is essential for tutorials, UI documentation, or capturing dynamic screen states.
4. Built-In Markup and Annotation Tools
Most users open screenshots in external editors to highlight or annotate — but screenshot tools often have integrated markup capabilities you may not notice.
Key features:
- Draw, underline, highlight
- Add shapes (arrows, boxes, circles)
- Insert text, numbers, and callouts
- Blur or pixelate sensitive information
How to use:
- Windows: After a Snip, use the toolbar to annotate before saving.
- macOS Preview or Markup window: Opens automatically for quick edits.
- iOS/Android: Tap the preview to enter edit mode with highlighter and pen tools.
These tools are ideal for work feedback, tech support, or educational use.
5. Clipboard-Only Captures (No File Creation)
Taking a screenshot doesn’t have to mean cluttering your storage with image files. Many platforms allow you to capture and copy to clipboard only, skipping file saving altogether.
How to use:
- Windows: Press Ctrl + PrtSc or Alt + PrtSc to copy the active window to clipboard.
- macOS: Add Control to your usual screenshot keys — e.g., Control + Command + Shift + 4.
- iOS/Android: Screenshots are saved by default, but some apps allow you to share directly without saving.
Great for temporary usage like pasting into emails, chats, or documents without clogging your files.
6. Quick Sharing and Cloud Uploads
Modern systems streamline the sharing process — no need to open file managers or compose new messages manually.
How to use:
- Windows Snip & Sketch: After capturing, use “Share” directly to Teams, Outlook, or Nearby Share.
- macOS: Drag the preview thumbnail into any app or use the “Share” button to AirDrop, Mail, or Messages.
- iOS/Android: Tap share from the screenshot preview for direct upload to Drive, Dropbox, or social media.
This is invaluable for professionals, marketers, and remote workers who send visual feedback regularly.
7. Screen Recording (Not Just Still Shots)
If a picture’s worth a thousand words, a video might be worth a million. Many screenshot tools also offer screen recording, including partial recording and audio narration.
How to use:
- Windows (Xbox Game Bar): Press Win + G > Record from selected window or screen.
- macOS: Command + Shift + 5 > Select “Record entire screen” or “Record selected portion.”
- iOS/Android: Enable screen recording from control center or settings.
Ideal for tutorials, troubleshooting guides, or quick how-to demos.
8. Pinned or Floating Screenshots
Some tools allow you to pin a screenshot on top of all windows — extremely useful when referencing data or copying content from one app to another.
How to use:
- Windows (Snip Tool Preview in PowerToys): Use “Always on Top” feature to pin snips.
- macOS: Use third-party apps like ShotBox or Snappy for floating shots.
- Android (via Google Lens or apps like Screen Master): Overlay floating screenshots.
This feature is great for multitasking, transcription, or manual data entry.
9. Custom Screenshot Shortcuts and Regions
You can tailor your screenshot behavior by customizing keyboard shortcuts or setting default capture regions.
Examples:
- Windows PowerToys: Customize shortcut keys, capture behavior, and assign hotkeys for different tasks.
- macOS Automator or third-party tools: Set custom commands for unique capture styles.
- Android/iOS (with third-party apps): Some apps let you preset specific areas or gesture triggers.
Tailoring shortcuts to your workflow can save seconds — which add up fast during daily use.
Final Thoughts: Small Tools, Big Gains
Your screenshot tool is more than just a screen grabber. It’s a hidden productivity hub — one that can help you:
- Capture and organize ideas
- Communicate more clearly
- Streamline collaboration and documentation
By unlocking these lesser-known features, you transform a simple utility into a powerful creative and organizational asset.
So the next time you take a screenshot, don’t just hit “Save” and move on. Take a moment to explore what else your tool can do — and make every capture count.